⚠️Important: Check GMAIL Spam & mark STRAPCODE "safe" to receive our exclusive newsletter with great info and deals!
Menu
-
-
Watch Bands for SEIKO
-
Customized Watch Bands
-
STRAIGHT Watch Bands
-
-
Quick Release
-
LEATHER & RUBBER
-
Accessories
- Login
-
United States (USD $)

⚠️Important: Check GMAIL Spam & mark STRAPCODE "safe" to receive our exclusive newsletter with great info and deals!
Quick Guide to Show You How to Change and Shorten a Seiko Watch Band!
September 10, 2021 5 min read 1 Comment

There are a ton of reasons why you would want to change a watch band. Whether the factory watch band that came with the watch is either too big or too small for you, or perhaps it is an old watch band that has been wearing and tearing over time, or simply because you want to give your watch a brand new look, to learn how to change a watch band will certainly benefit you in the long run. Watch bands can be replaced relatively easily, but it can be a tricky at times. Once you learned how to replace a watch band, you can change it as frequent as you like to match your wardrobe. Here are a few tools that we recommend would help make changing a watch band a whole lot easier.
Introduction of Watch Band Tools
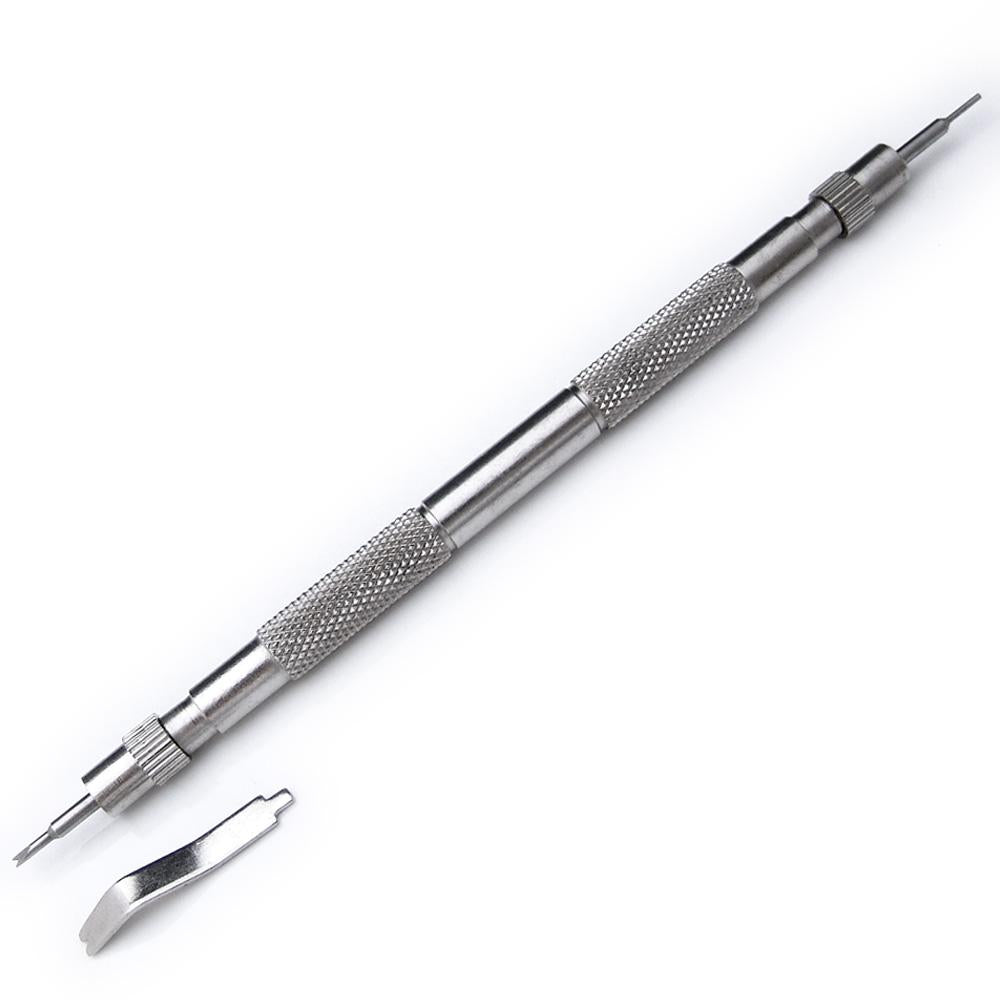
- Spring Bar tools
- All in one - watch band pin removal tool
- Bracelet Holding Block Standard Slots
- Watch Hammer
- Punch Pins
Entry Level Spring Bar Tool and Pin Removal tool
All in one watch band pin removal tool (bracelet shortener)
Advanced Level Watch Band and Link Removal Tool
High-quality watch band tools are specially designed for high-accuracy applications, perfect tool to use for installing and removing spring bar on/off metal watch bands or mesh watch straps.
Part 1 : How to Change Watch Band
Step 1
Let’s assume that we’re removing a metal watch band in this case. With a metal watch band, open the bracelet up and lay it on the side and insert it into the holding block. Remove the spring bar from the clasp and use the spring bar tool (the push pin end) to depress on the spring bar and release it from the clasp.

First of all, uninstall the watch clasp, use the push pin end of the Spring Bar Tool
Step 2
Some may recommend covering the lugs (minus lug holes) with masking tape to avoid potential scratching from the tools. Lay the watch face down on a leather pad, or perhaps even a towel. Insert the forked end of the spring bar tool into the small gap where the spring bar is visible to catch the shoulder (ridge) of the spring bar.
 Spring Bar Tool with fine fork tip end for precision grasping
Step 3
Depress the spring bar by applying pressure with the tool towards the watch band and away from the watch case. When the spring bar is clear of the lug, that side of the band will out of the watch case.
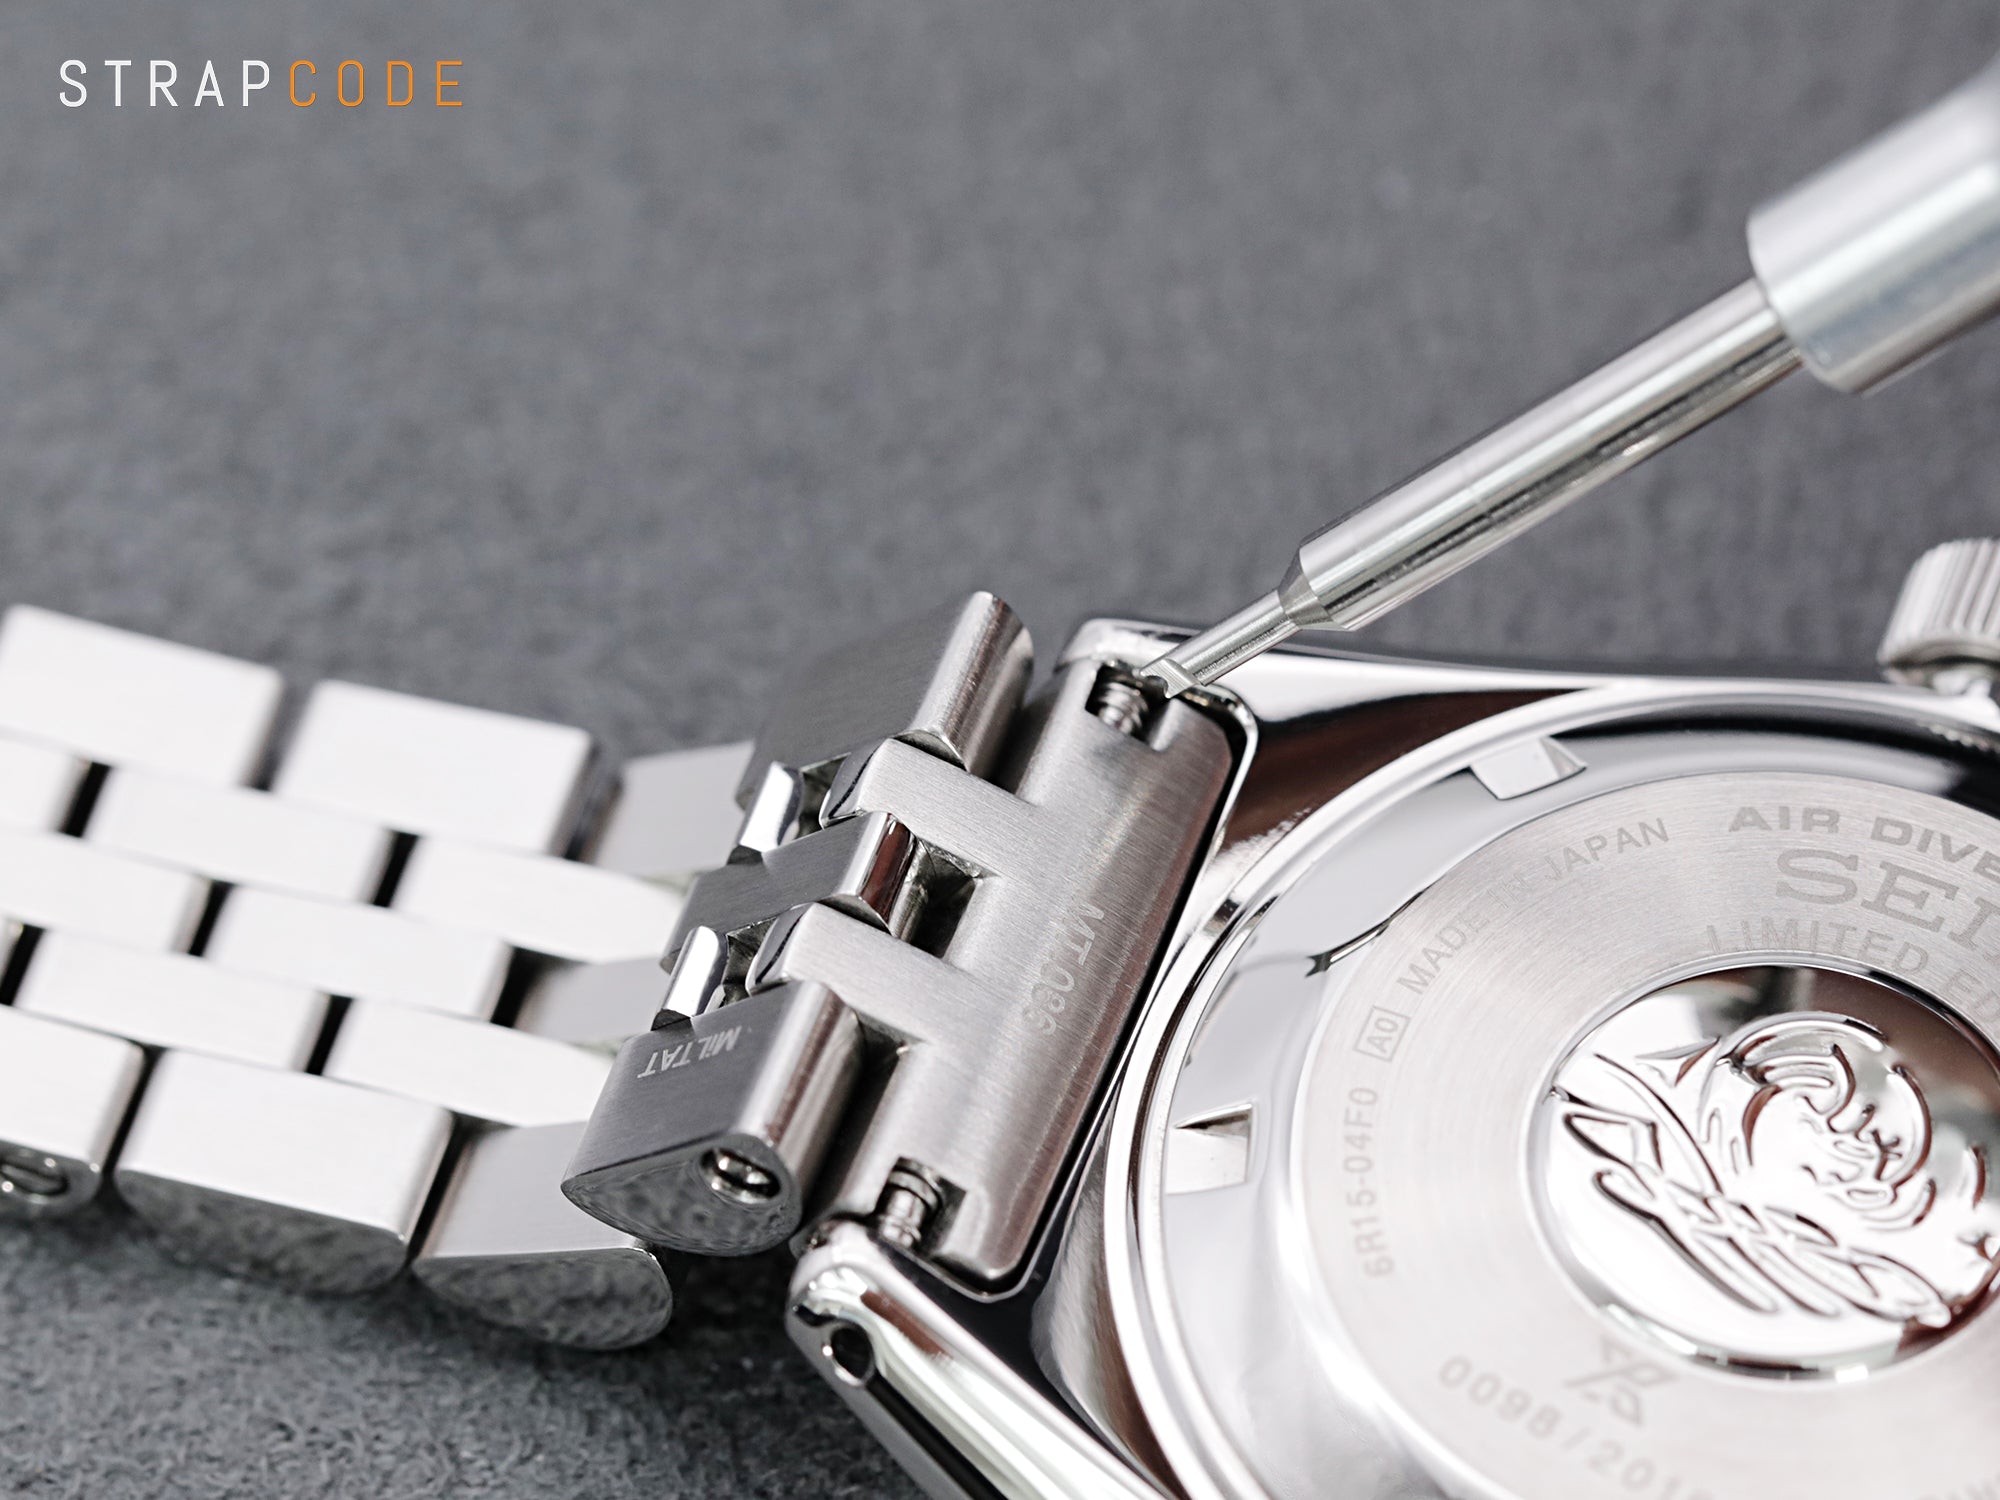
 When the spring bar is clear of the lug, that side of the band will out of the watch case
Step 4
Slide watch around to the other side and repeat steps 2-3 to the other side of the watch band. Once completed on both sides, you’re all done! If the spring bars are in good condition after removal, they can be re-used on the replacement band.
How to Shorten and Adjust Your Seiko Watch Band | Demo Video by Strapcode
Part 2 : How to Shorten a Watch Band
Please note that watch bands from big watch companies such as Citizen, Orient and even Seiko watch bands, are often held together by watch band pins that require the use of a hammer to pop the pin out instead of using screws where you would need to use a mini screwdriver to loosen the screws.
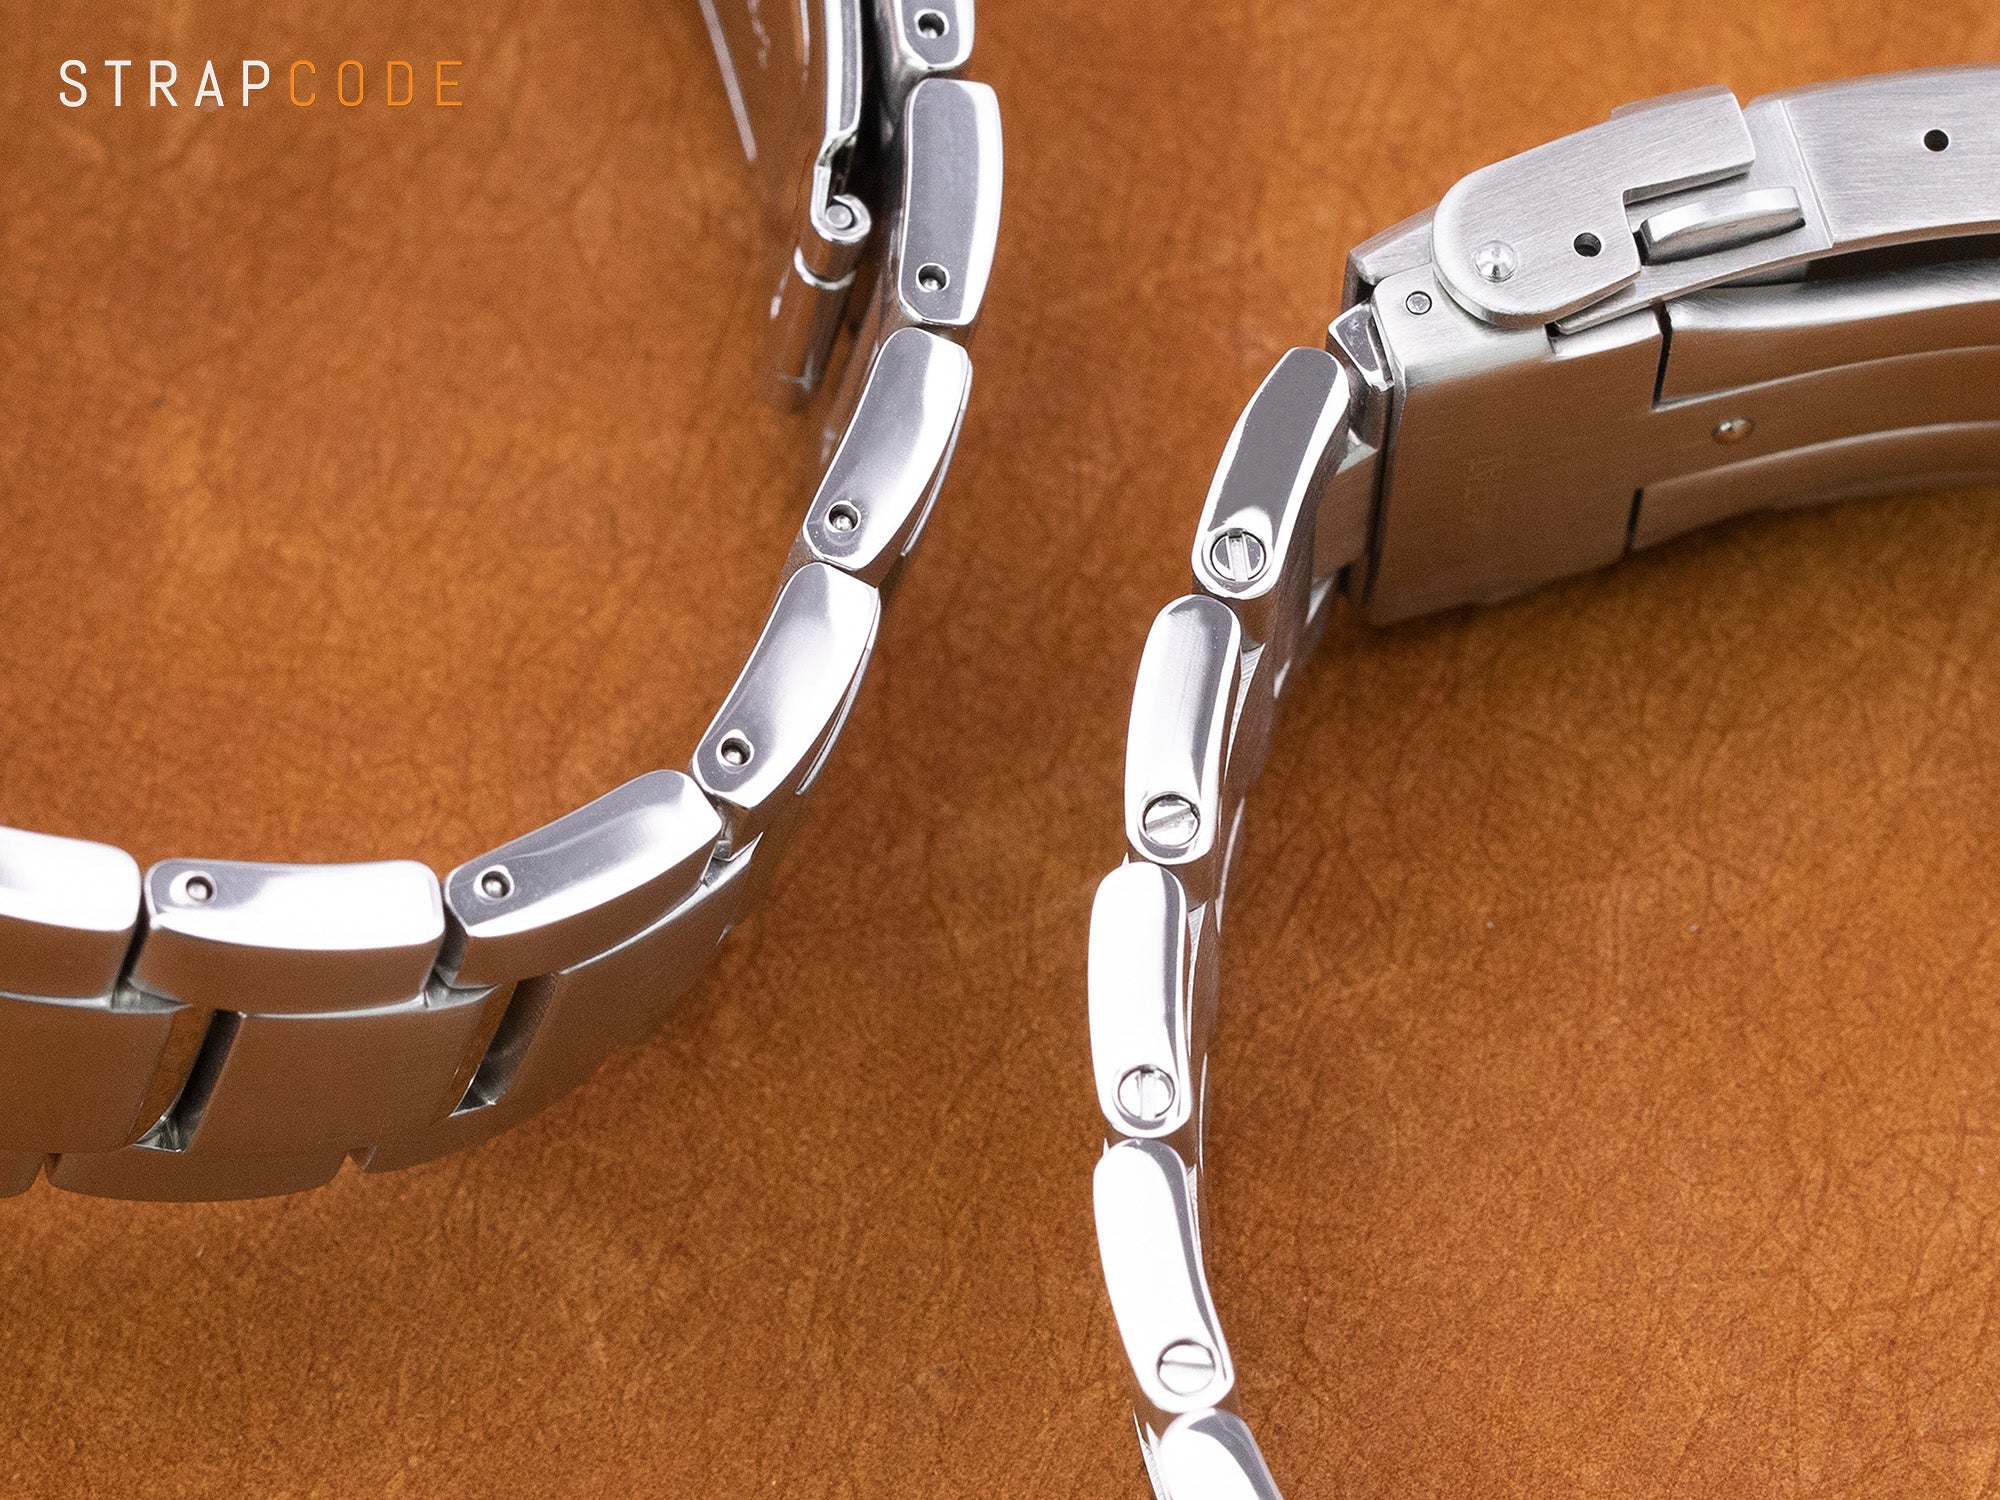 Left : Pin type metal watch bands common found in original Citizen, Orient, Seiko Watch Bands. Right : Screw-type stainless steel watch band by MiLTAT, you will need a screwdriver to adjust the length
The following demo of "How to Adjust a Watch Band" was using an original Seiko watch band (pin type) plus advanced level watch band and link removal tools. Read it through step by step, you will find removing links from watch band is just a ease.

Step 1
Put on your watch and position it to where you want it to sit on your wrist. Pinch the slack and count the excess links, keeping in mind the placement of the clasp; the clasp adjustable side should be connected to 12 o'clock as shown. Always choose the longer band at 12 o'clock instead of centered on the bracelet. If possible, always take out an uneven number of the total links, let the two upper and lower bands have one link difference (the end linked to 6 o'clock should always be shorter) from each side of the watch band, so that you will feel more balanced and sit evenly on your wrist.
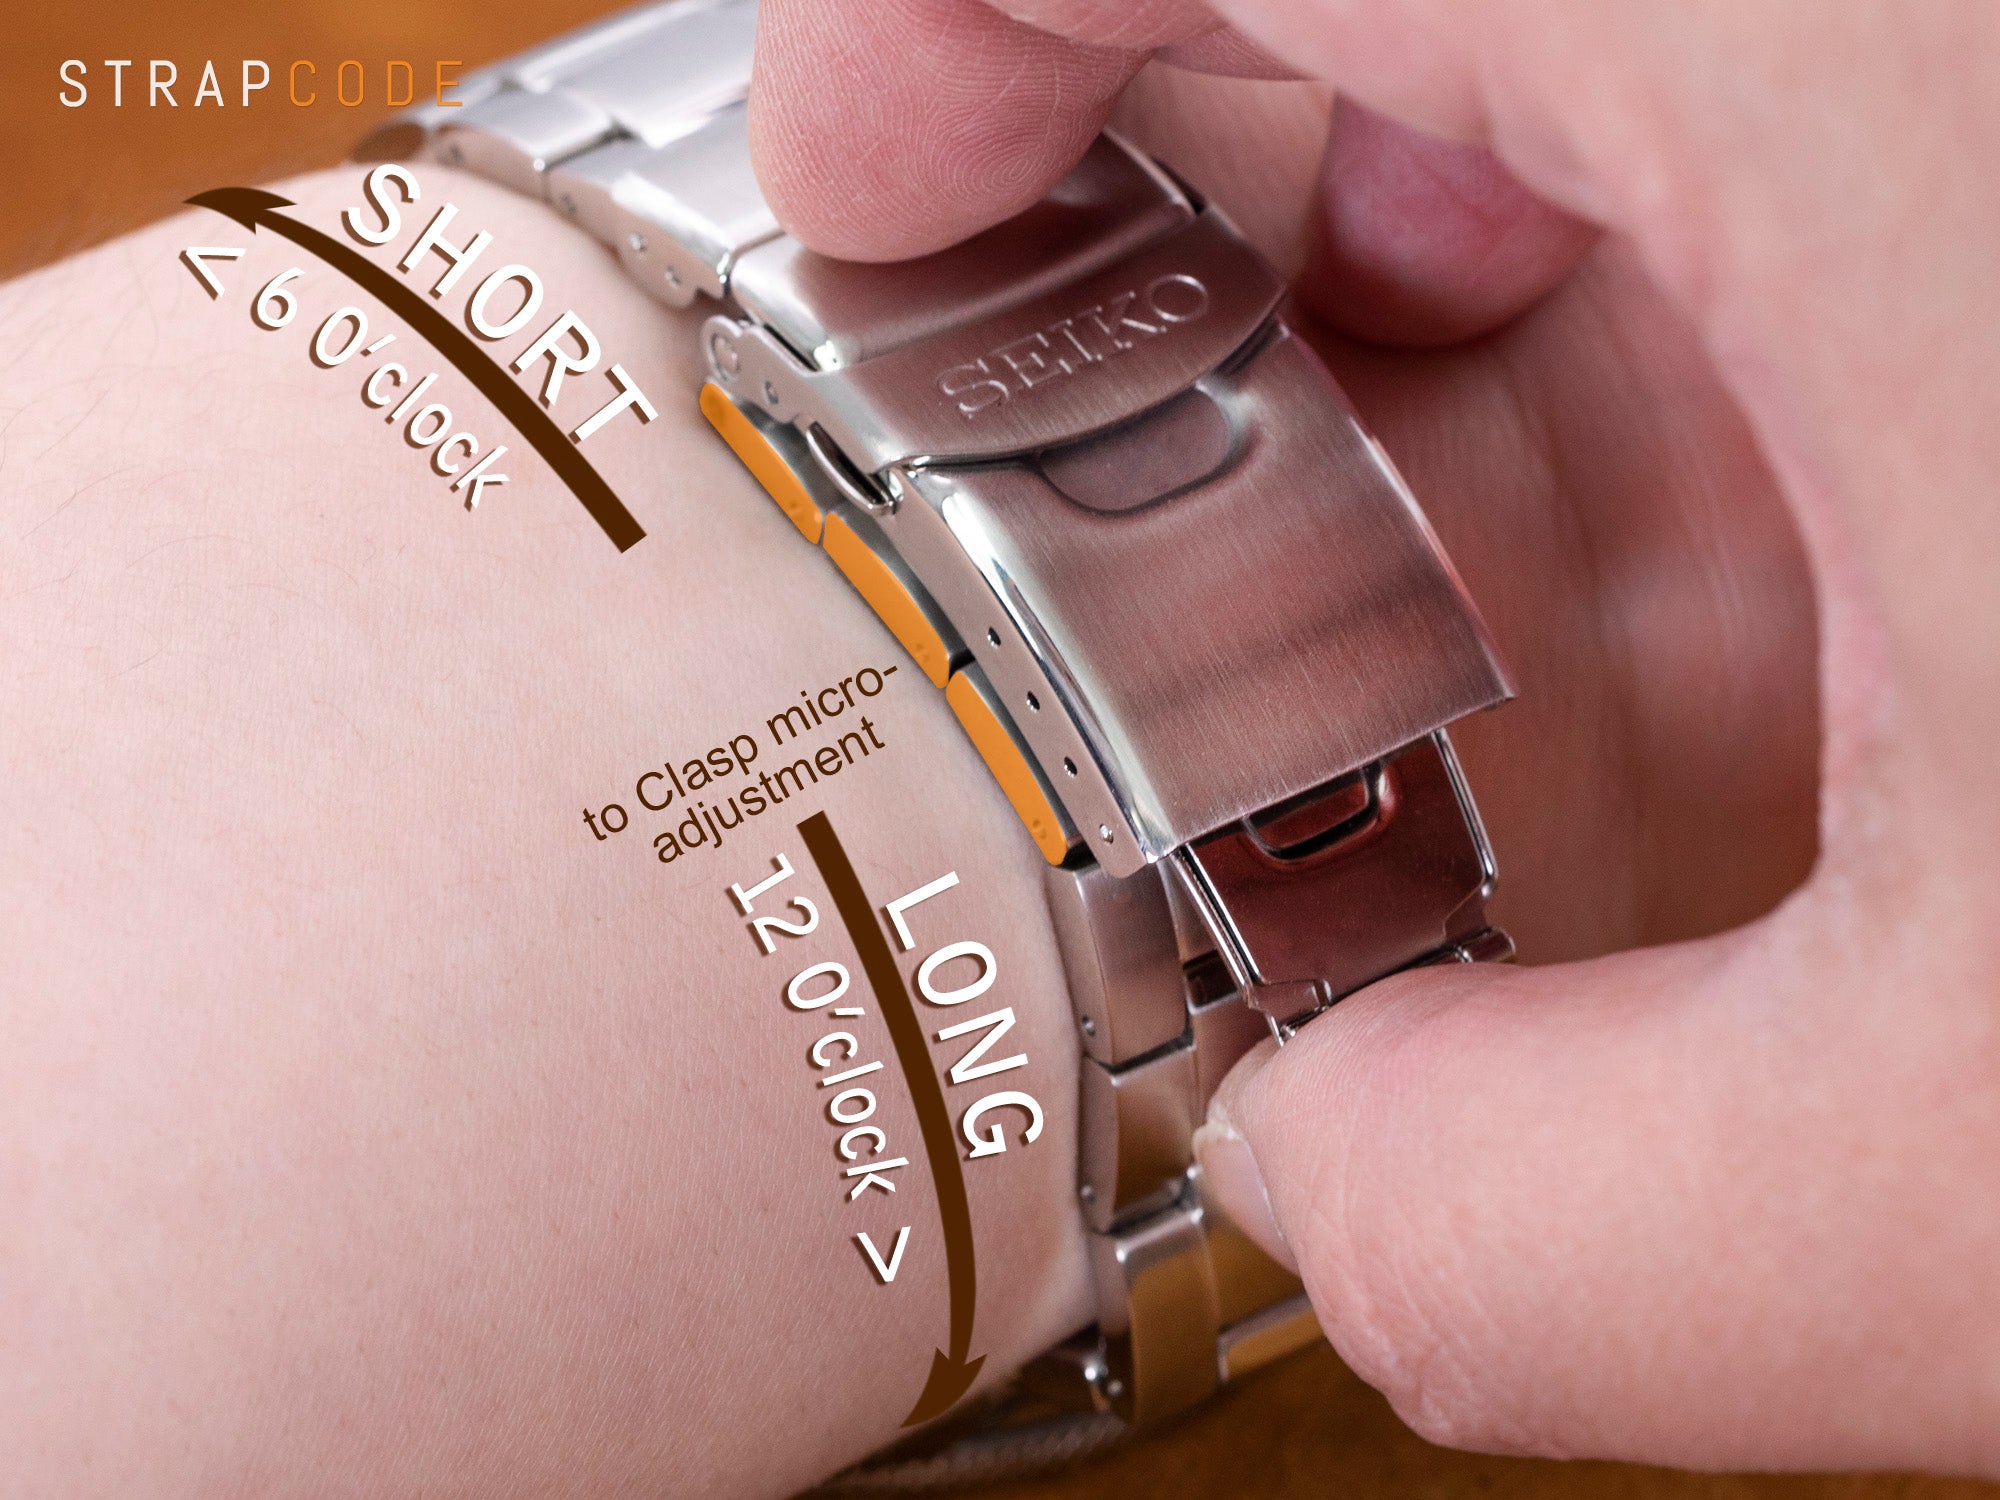 The longer side linked to 12 o'clock is also connected to the clasp's micro-adjustment end for length fine-tune
Step 2
- (Depends if your clasp have micro adjustments)
Most metal watch band designs have a micro adjustment area in the buckle. If your watch band has this feature, you can make minor adjustments by moving the spring bar in the buckle in or out to slightly alter the overall length. Otherwise, you can skip this step and proceed to Step 3.
Step 3
- Check the number of links need to be removed
Look for the links with arrow marks on the side of the bracelet links, indicating which links are removable. Make sure to only remove links with arrows on the back side, the rest of the links are not designed to be removed. Place your watch band in the holder so that the arrows are pointing down. If there aren’t arrows on your watch band, look for the side where the watch band pins sit further inside the hole.

Step 4
- Remove pins and to take links out of a watch band
Hammering in the same direction as to where the watch band pins are pointing, align the point of the push-pin tool to the pin and lightly tap against the tool with the flat end of the hammer until you can no longer push the pin inside the link.

The pin should come out on the other side. Use small pliers if necessary to pull the pin the rest of the way out. Repeat this step for the other links you’ll be removing.

Step 5
- Put back the watch bandAfter all of the required body links are removed, you can put the watch band pins back in the pinhole from the reverse side of the link that you removed them from. The pins fit back in one way, with the tip going in first. Place the watch band back onto the holder and use the flat end of the hammer (use the plastic hammer head to prevent any potential scratches) gently tap the pins back into place. If any ferrules came out when removing the pins, gently tap those back into place on both sides of the pin hole. If the pins go in too easily they may not hold, remove them and bend/curve them slightly and replace them. The small bend provides some tension to hold them in place.
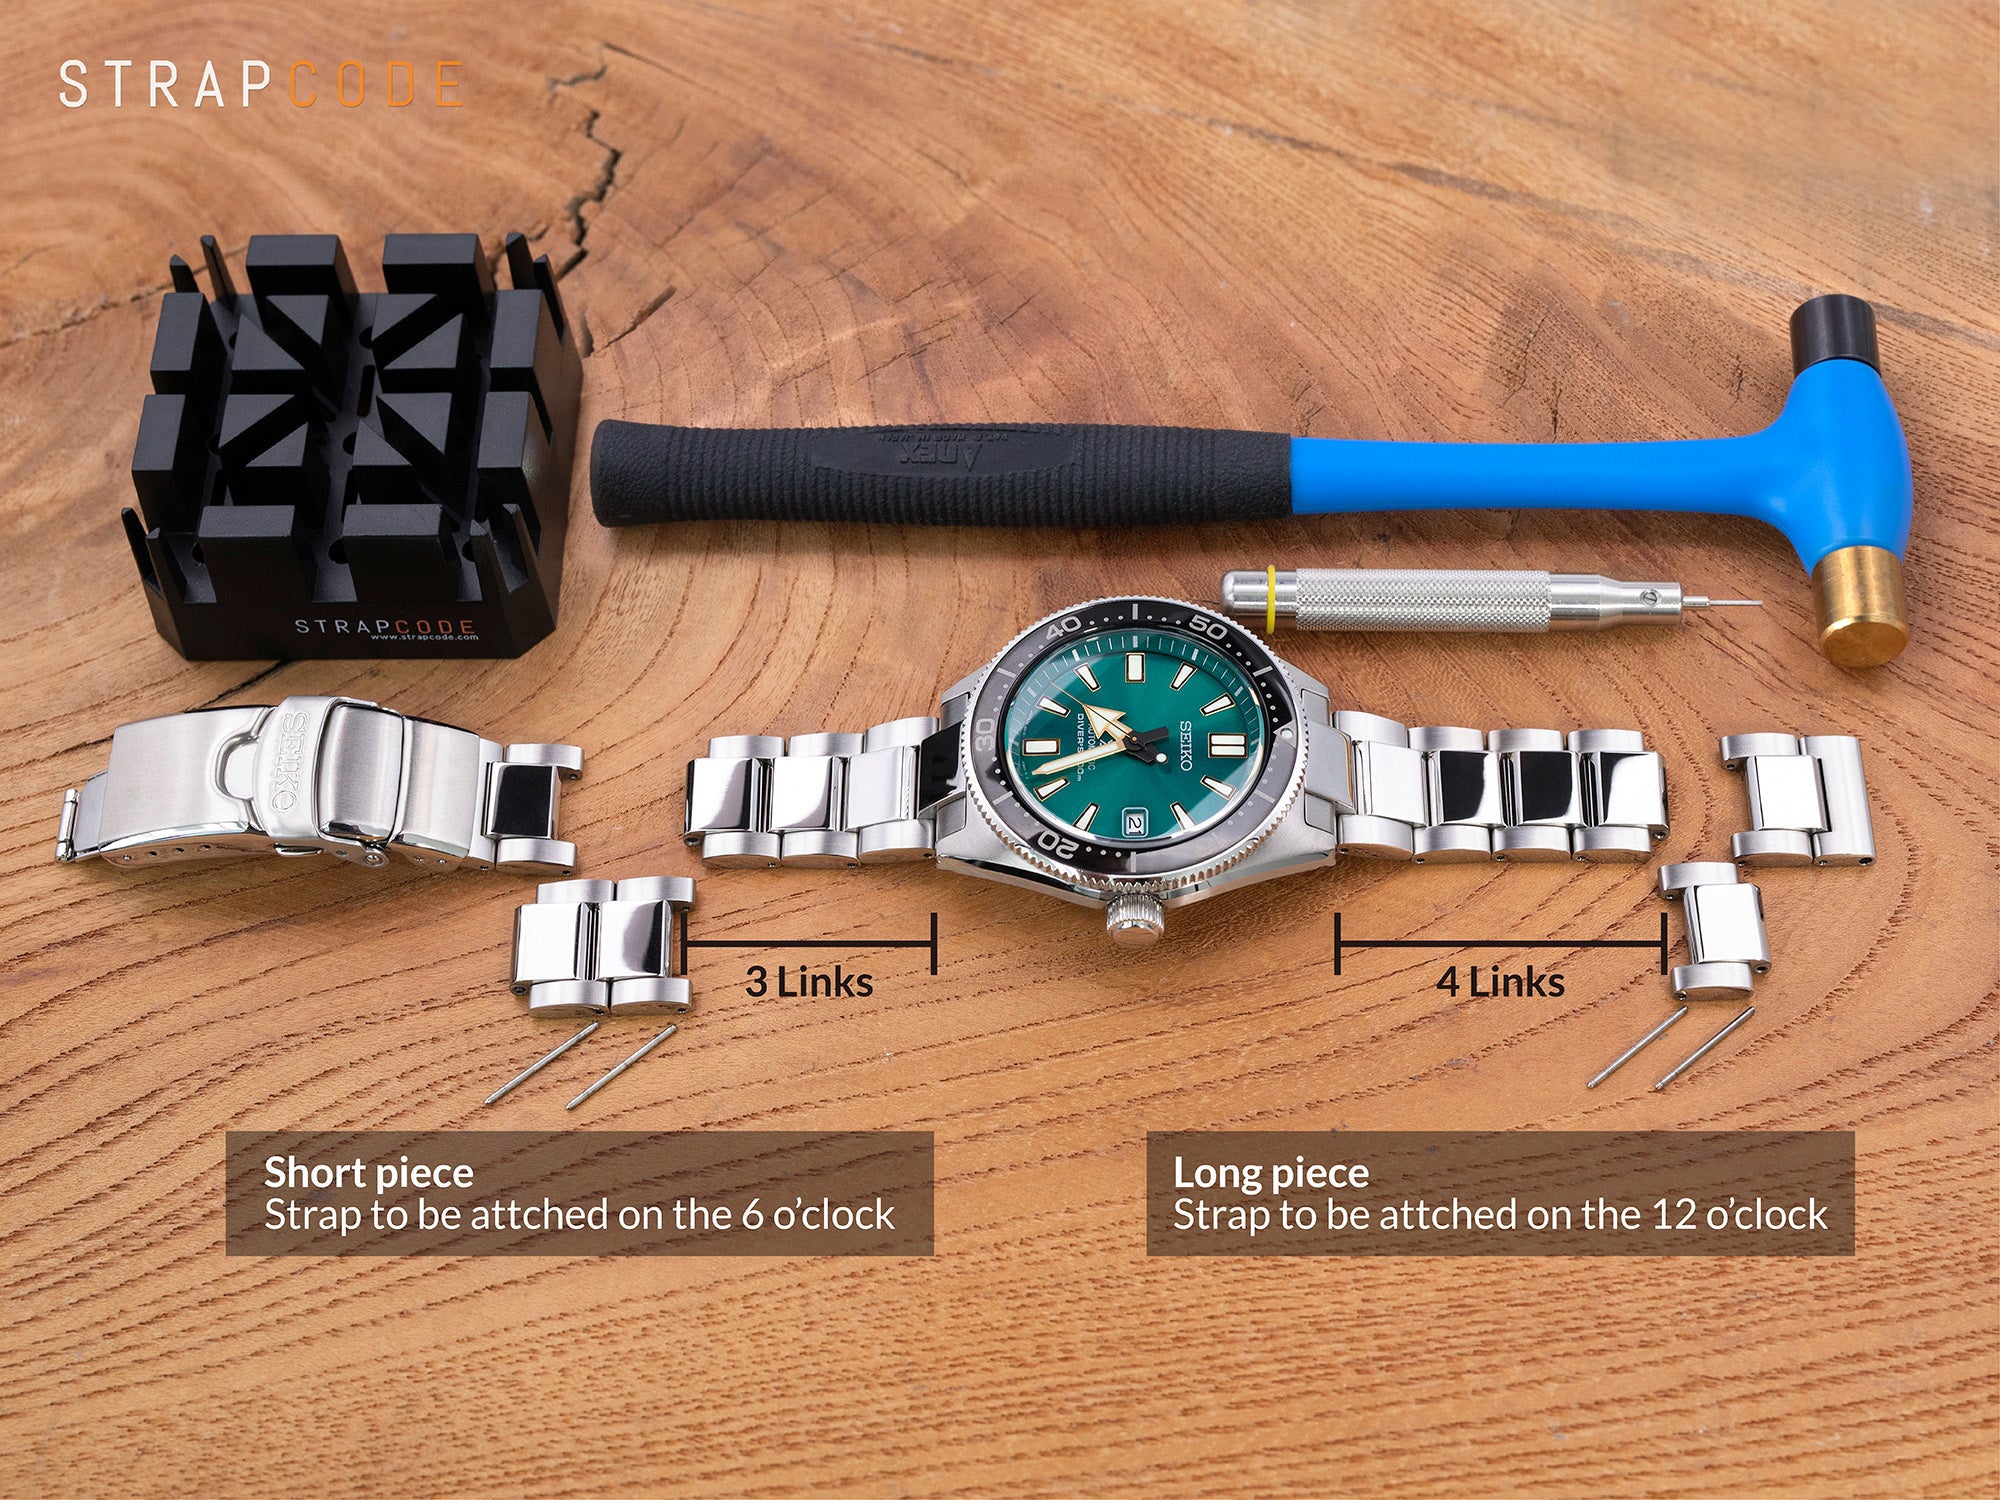
The watch band tools we used here : Watchmaker Hammer, Bracelet Holding Block Standard Slot, and Punch Pins - Watch Band Pin Remover
Step 6
- Check the fittingTry on the watch to ensure it fits on your wrist. If the watch can turn on your wrist the watch band is too loose. Properly fitting watch bands help protect your watch from sliding around and minimizes the chance of damaging it. As a friendly reminder, quality watch band tools can minimize the chance of scratching your watch and shorten the operation time. That's why high-quality watch band tools are always recommended, and they are worth every penny you have spent.

Related article
Watch Bands Wiki
SHOP Watch Band Tools
Written by Sam , images by Toni
1 Response
Leave a comment
Comments will be approved before showing up.
Also in Guide to watch straps

Time to Change: The 2025 Watch Revolution and the Art of Quick-Switch Customization
December 20, 2024 7 min read
Read MoreBe the first to know
Sign up to get the latest on Sales | New Releases & more …


Steve
September 06, 2022
I was just gonna watch an instructional video on this but found this is the 1st thing that pop it up when I entered into my website and this was an amazing instructional pc I just loved ITIT was crisp it was great on my TV I watched it on my 55" TVIT’s just awesome.